Agile Architecture
Performance on Amazon AWS 
Michiel Sens 14 Oct, 2012


Six years after the initial launch AWS announced the new Amazon Inspector. The launch took place during re:Invent 2021. With this launch the previous version has been renamed to Amazon Inspector Classic. The new Amazon Inspector is rearchitected to support a wider range of workloads and simplified workflow management.
The management of Amazon Inspector 2 has been simplified. Enabling and configuring Amazon Inspector can be done with a few API calls or, if you persist on manual labor, a few clicks in ClickOps. To give an idea of the steps needed to enable Inspector for both existing and new member accounts, the steps are listed below.
How to enable Amazon Inspector? In a single account it is now as easy as running the command below:
$ aws inspector2 enable
    --resource-types EC2 ECR
If you want to enable Inspector in your AWS Organization, run the previous command in your Organizations master account and then enable this account as a delegated admin account. The account ID can be any account in your Organizations (preferably a dedicated security account). In this case we use 123456789012:
$ aws inspector2 enable-delegated-admin-account
    --delegated-admin-account-id 123456789012
Now configure Inspector for all members by associating all member accounts. You only have to do this for existing member accounts and you can do this by running this command from your delegated administrator account:
$ aws inspector2 associate-member
    --account-id 111111111111
$ aws inspector2 associate-member
    --account-id 222222222222
$ aws inspector2 associate-member
    --account-id 333333333333
$ aws inspector2 associate-member
    --account-id 444444444444
Note: this can take a while before all accounts are enabled. You can view the status by running:
$ aws inspector2 list-membersWait for all accounts to get the status “relationshipStatus”: “ENABLED” before running the next command.
Final step is enabling EC2 and ECR scanning in all member accounts:
$ aws inspector2 enable
    --resource-types EC2 ECR
    --account-ids 111111111111 222222222222 333333333333 444444444444
Inspector is now enabled for all existing member accounts. Turn auto-enable on so that scanning is enabled for new member accounts:
$ aws inspector2 update-organization-configuration
    --auto-enable '{"ec2": true, "ecr": true}'
You need to repeat the steps above for each Region in which you want to enable scans for your members.
Inspector is now ready to be used and unlike the previous version there is no need to create schedules via Amazon CloudWatch Events. Inspector will immediately start scanning any existing EC2 instance and ECR repository. Scans for EC2 are automatically initiated when launching new instances, installing new software, Inspector database updates, et cetera. Scans for ECR can be done with continual scanning (with Enhanced scanning enabled on ECR) or on-push.
To scan EC2 instances with full visibility make sure you provision your EC2 instances with the AWS Systems Manager (SSM) agent configured. Make sure the SSM agent is running and AmazonSSMManagedInstanceCore policy added to the instance profile). Without the SSM agent, configure Inspector will only present open network paths, but not CVEs. You don’t have to install the separate Inspector agent any longer.
Given the simplicity of the steps illustrated earlier it won’t be very hard to do the same within your favorite Infrastructure as code (IaC) tool. If you are a CloudFormation user you currently have to build custom resources to make it happen. For AWS CDK users we have a construct available on Construct Hub.
Amazon Inspector 2 uses AWS Organizations features to allow central management and visibility. This makes it more convenient to manage a multi-account environment. The delegated master account will host all findings from the member accounts, allowing simplified management by the security department and hassle-free automation. Findings are also pushed to Amazon EventBridge. With this it is a lot easier to write event-based automation tasks to do, for example, event analysis and auto-remediation using Lambda or Step Functions.
The visibility has also been rebuilt. It is now possible to select multiple views. Findings can be viewed by vulnerability, account, instance, container image and repository.
Time for some screenshots. The general overview of Inspector:

Inspector findings overview
If you then click the kernel package you will get an overview of all CVEs detected in this package:
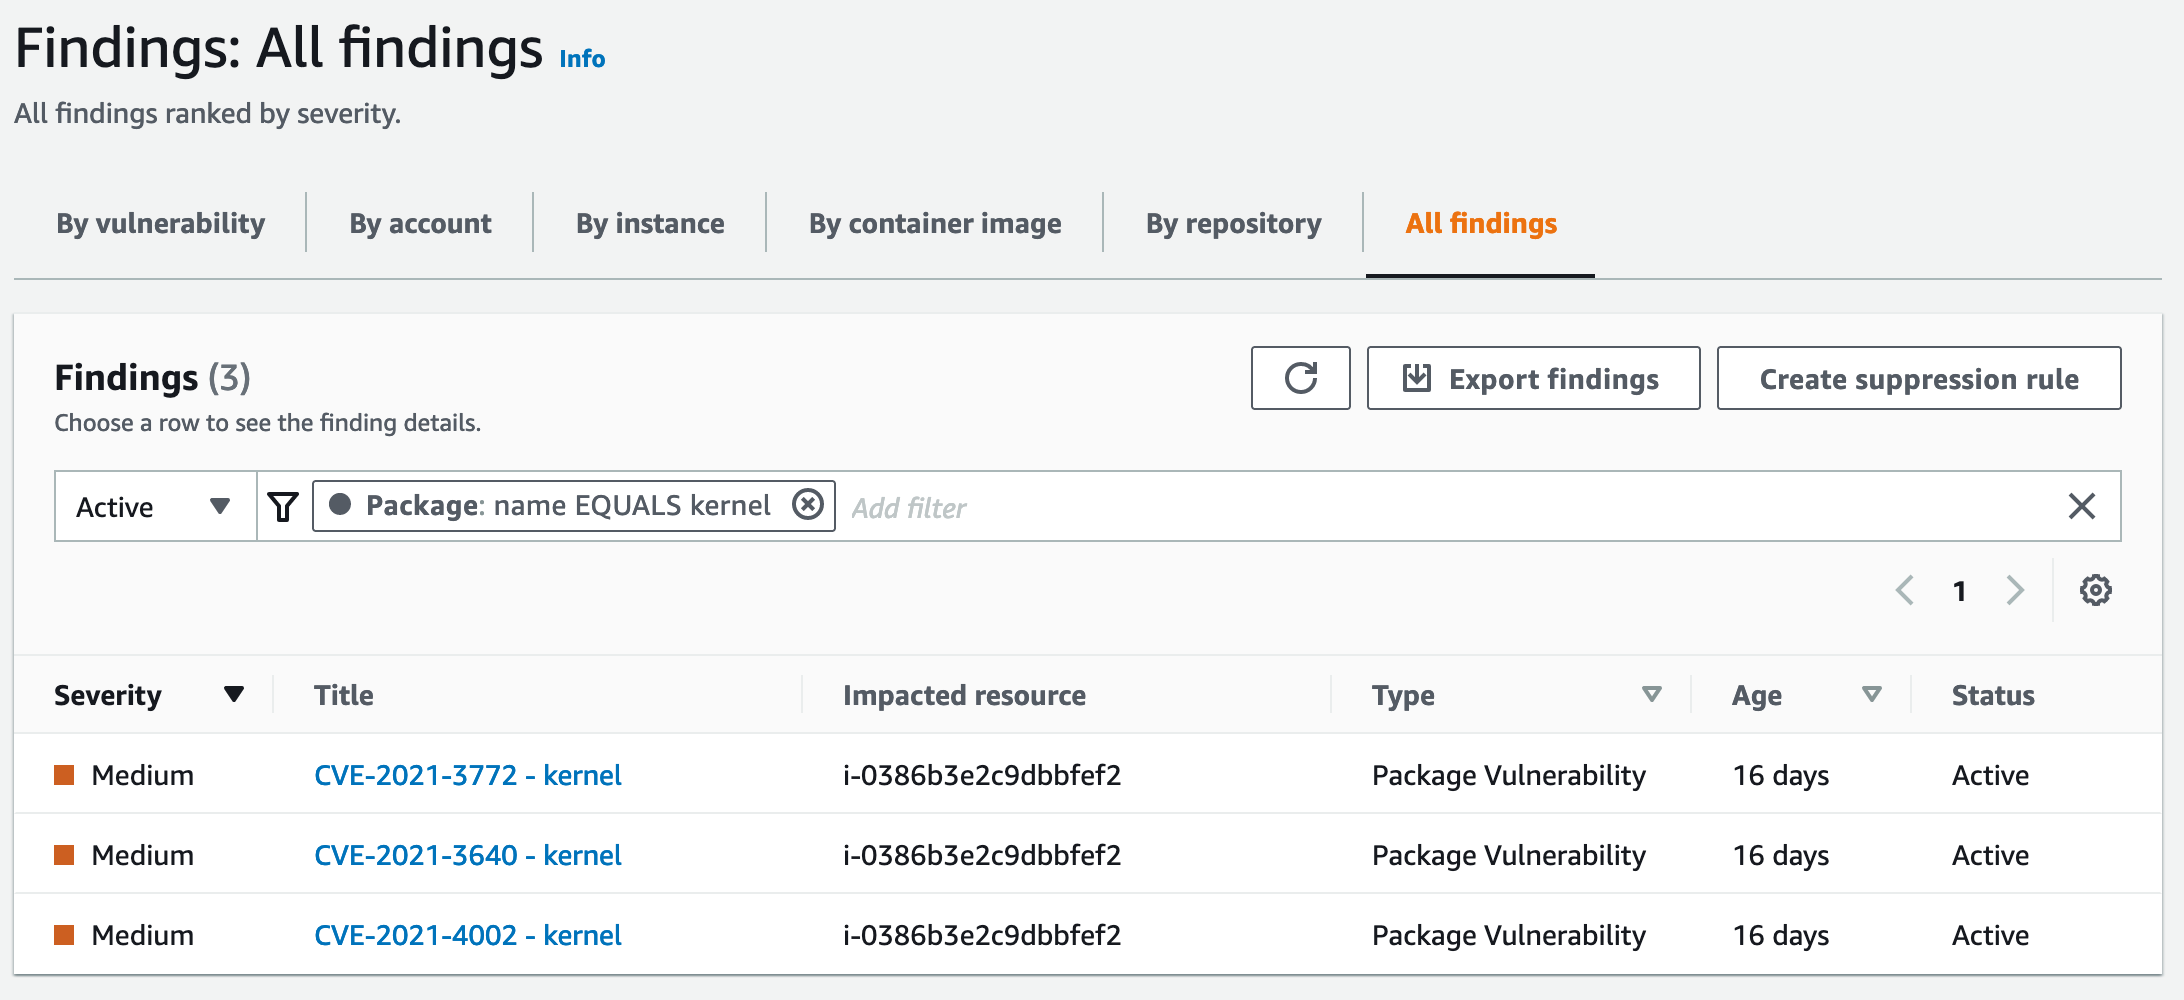
Inspector CVE view
By selecting findings by vulnerability you will see this screen:
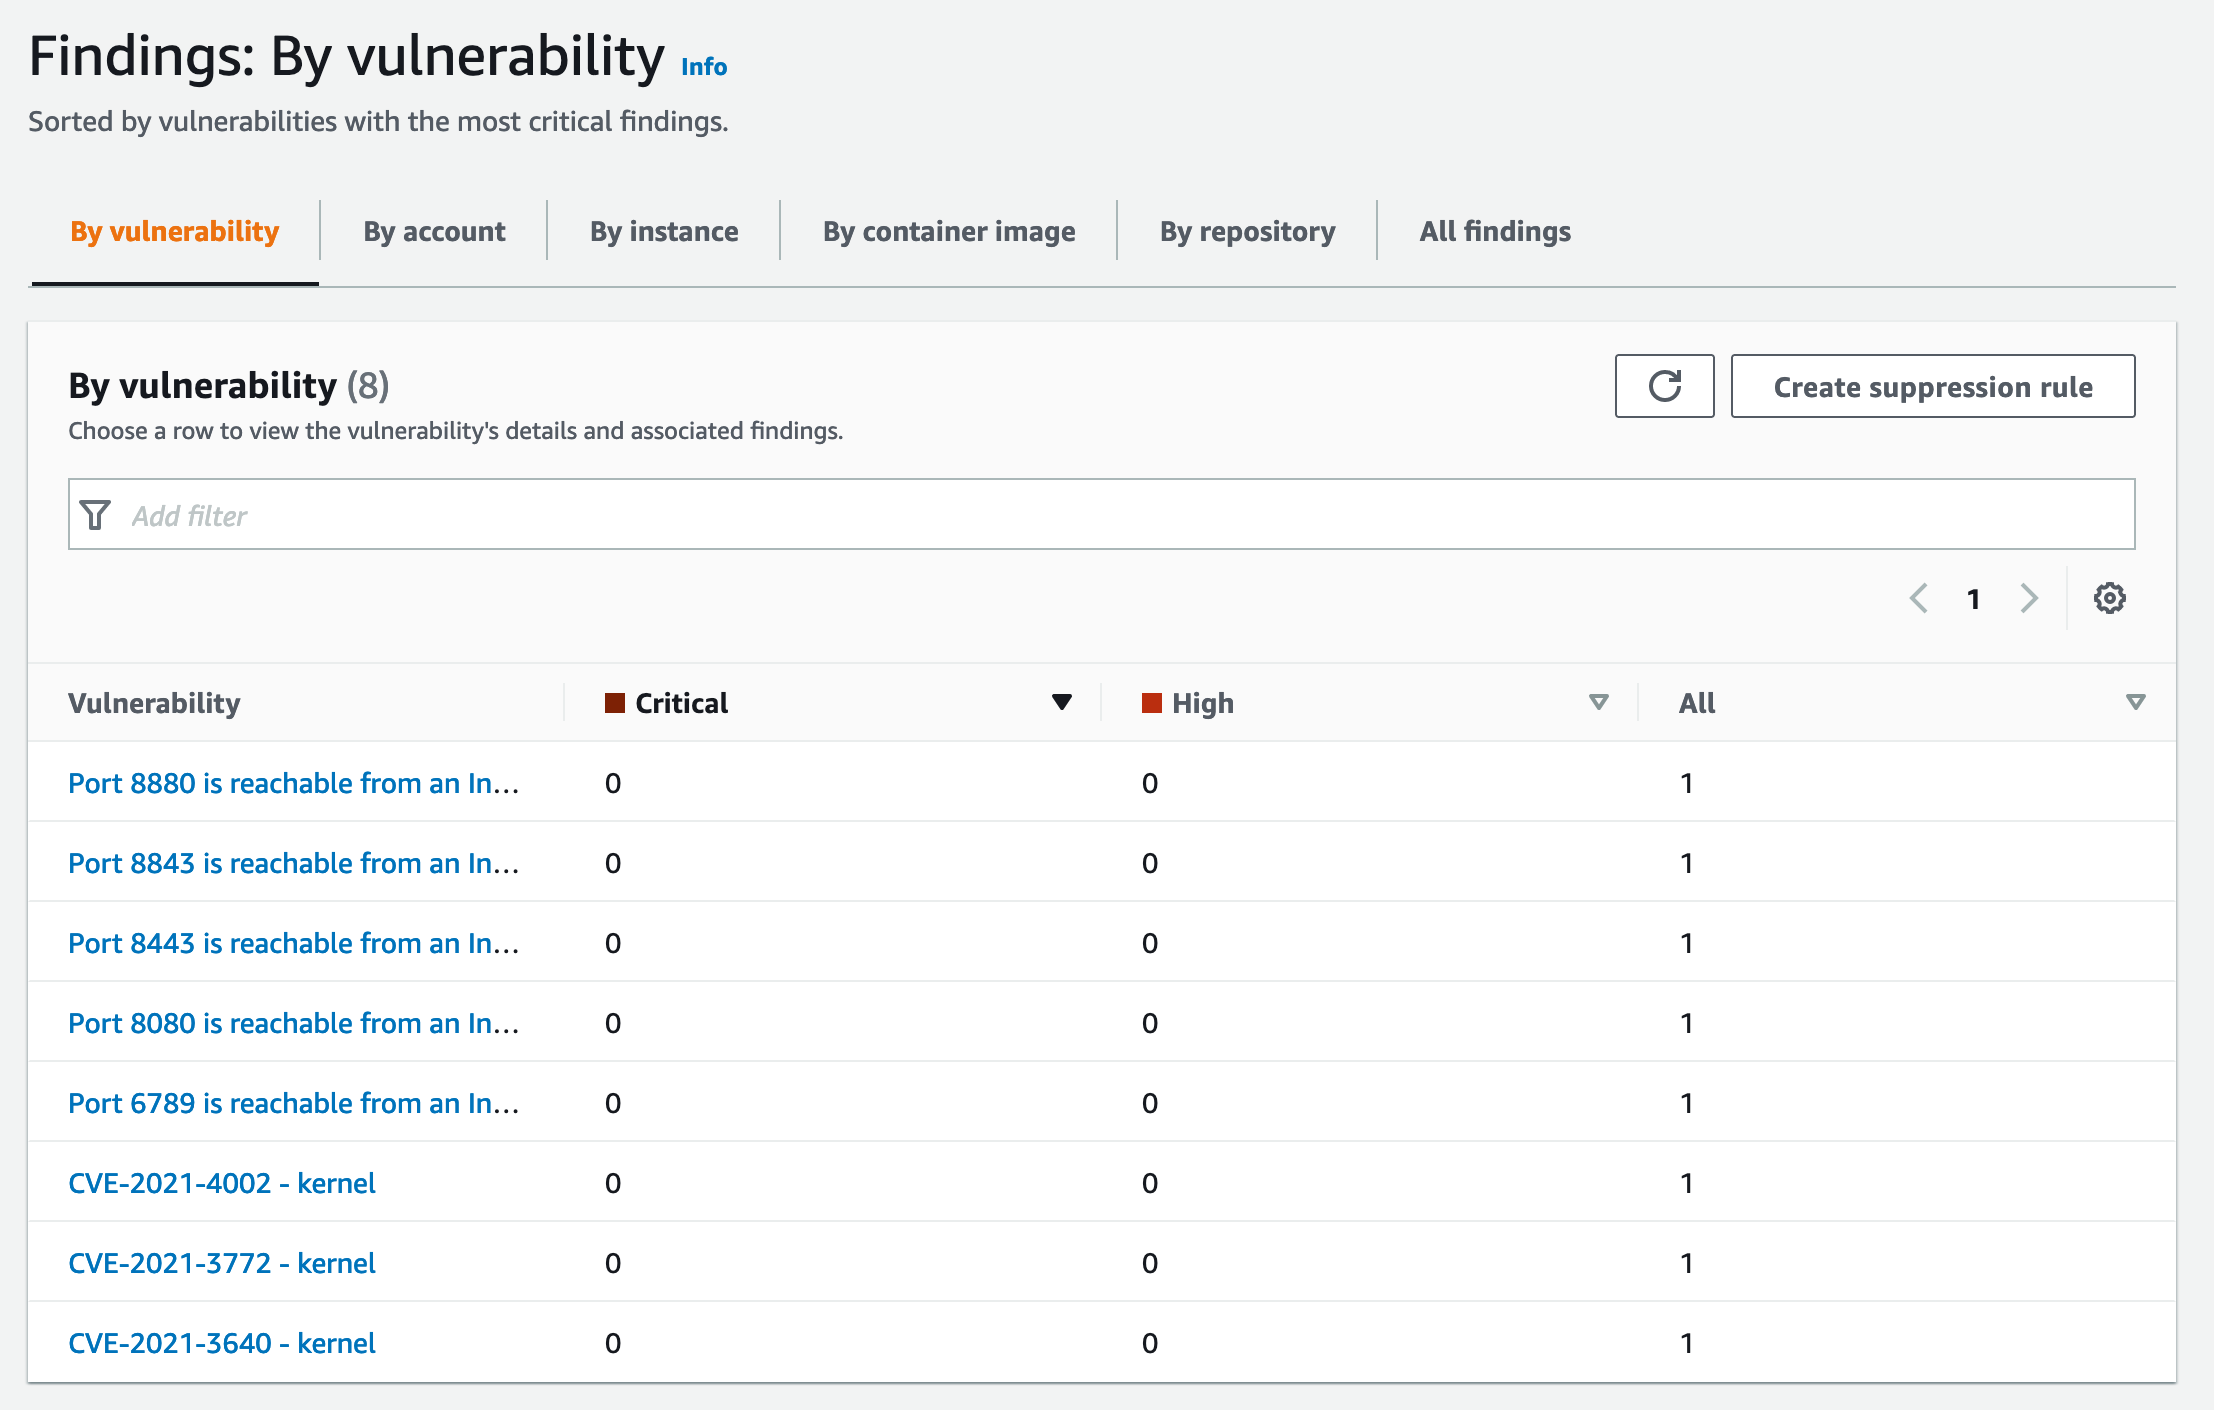
Inspector: By vulnerability
Also new is the integration with Security Hub. If both Inspector and Security Hub are enabled findings will be sent automatically to Security Hub to give a comprehensive view of your security state. This will also allow easier integration with 3rd party solutions such as Splunk.
Screenshot from Inspector findings reported in Security Hub:
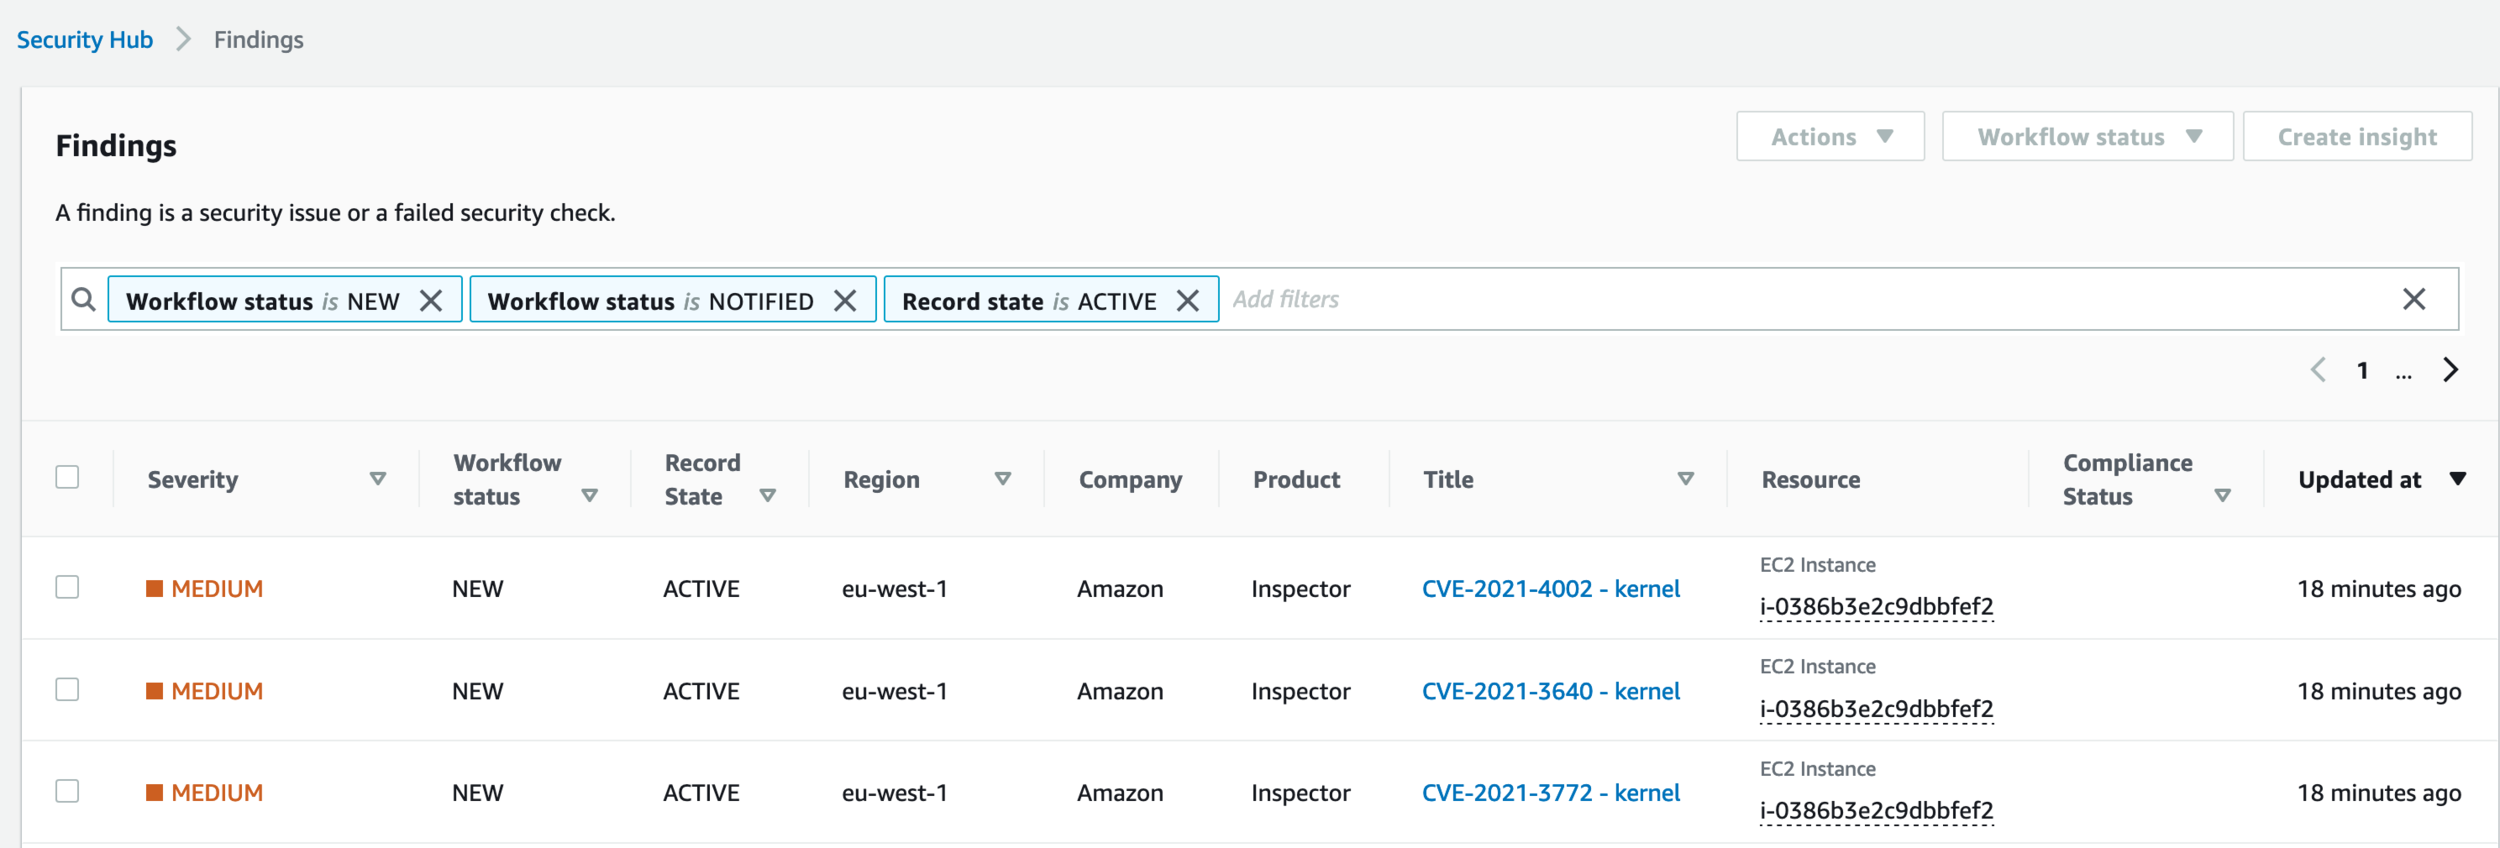
Inspector Security Hub
The finding in Security Hub holds all the details required for triage and analysis. This is a snippet (just the Vulnerabilities field):
{
    "Vulnerabilities": [
        {
        "Id": "CVE-2021-4002",
        "VulnerablePackages": [
            {
            "Name": "kernel",
            "Version": "4.14.252",
            "Epoch": "0",
            "Release": "195.483.amzn2",
            "Architecture": "X86_64
            }
        ],
        "Cvss": [
            {
            "Version": "3.1",
            "BaseScore": 5.1,
            "BaseVector": "CVSS:3.1/AV:L/AC:L/PR:N/UI:N/S:U/C:L/I:L/A:N"
            },
            {
            "Version": "3.1",
            "BaseScore": 5.1,
            "BaseVector": "CVSS:3.1/AV:L/AC:L/PR:N/UI:N/S:U/C:L/I:L/A:N",
            "Source": "REDHAT_CVE",
            "Adjustments": []
            }
        ],
        "Vendor": {
            "Name": "REDHAT_CVE",
            "Url": "https://access.redhat.com/security/cve/CVE-2021-4002",
            "VendorSeverity": "Moderate",
            "VendorCreatedAt": "2021-11-25T00:00:00Z"
        },
        "ReferenceUrls": []
        }
    ],
    "FindingProviderFields": {
        "Severity": {
        "Label": "MEDIUM"
        },
        "Types": [
        "Software and Configuration Checks/Vulnerabilities/CVE"
        ]
    }
}When using Inspector Classic it was required to specify which EC2 instances to scan, based on tags. With Inspector 2 this has been changed. Inspector 2 will start the discovery of supported resources automatically, depending on which services you enable scans for. If you’ve used EC2 resource tags in Inspector Classic to limit the scope of Inspector, you can now do that by specifying ResourceTags in the FilterCriteria when listing all findings reported by Inspector.
This automated discovery will make it easier to demonstrate compliance, since the scope will be “all EC2 instances with the SSM Agent working are included”. With this you’re no longer dependent on manual and error-prone work such as tagging.
Findings now include more actionable detail compared to Amazon Inspector Classic, including improved contextual risk scoring that clarifies how to prioritize and respond to the most critical findings. This will make it easier to do triage and analysis. You can focus on the most important findings first.
As I said, findings are now automatically pushed to EventBridge and Security Hub. This simplifies the automated response workflows and security event management. In addition, Inspector now comes with new management API calls which allow much easier to configure organization-wide configuration.
Vulnerability scanning has never been this easy. 🙂
Amazon Inspector Classic (v1) will be deprecated. A 12-month depreciation notice will be put on the service soon.
Read more about this announcement and the User Guide. Or read up on the other announcements of re:Invent on our blog.


