AWS | Cloud | Cloud Engineering | Technology
Club Cloud Stories 
Jacco Kulman 25 Oct, 2021


We do encounter a mix of DevOps tools being used in cloud projects. For reasons we do prefer to work with AWS native tools and services. One of the reasons (but certainly not limited to that) for that opinion is that native tools provide seamless integration with the fundamentals of AWS itself. Think of tight integration with AWS Identity and Access Management (IAM) or AWS CloudTrail. In AWS it’s common to assign roles to resources.
For example, steps in CodeBuild (‘build runners’ in CodePipeline) have an IAM role with least-privileged policies assigned to grant access to the platform. Roles are using short-lived credentials and are provided natively by the platform. The time to live varies per service, but mostly anything between 15 minutes and 6 hours. Way shorter than static credentials, which are most likely to be rotated every 90 days in theory. The reality is that rotating static credentials manually is a big hassle and (almost) nobody does it.
Credentials are a recurring topic in third party integrations. Most vendors have support for AWS Access key ID and Secret access key, which are static credentials that require manual rotation. Those credentials are typically stored in a vault and used by the 3rd party tool when authenticating API calls to AWS. Every 90 days an engineer has to create new credentials, update the configuration of the application and then finally deactivate and delete the previous set of credentials.
But there is hope. More and more vendors are adding OpenID Connect (OIDC) support to their software. OIDC is an authentication layer on top of the OAuth 2.0 framework. It is used to authenticate identities with an external identity provider. AWS has support for OIDC using external identity providers and assuming IAM roles with temporary credentials.
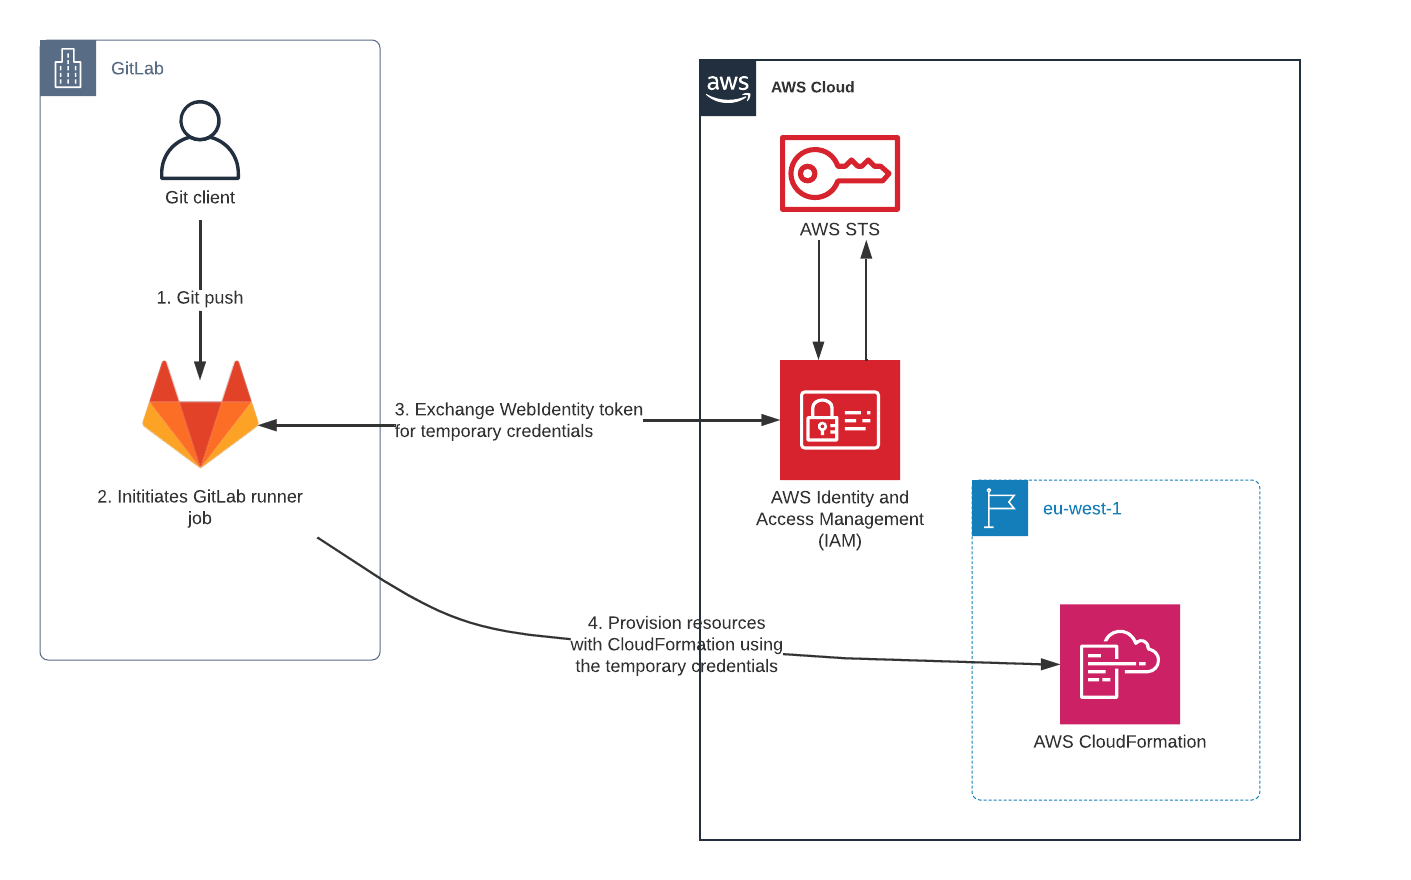
For this blog we take GitLab as an example. GitLab is a complete DevOps platform, including CI/CD capabilities. It is in use by many companies, has proper AWS support and can be consumed as a SaaS-service. GitLab has OpenID Connect support and can act as the identity provider. In this section I will describe how GitLab can be used in conjunction with AWS, without the usage of static credentials.
It is good to have an understanding of how things work, before diving into the configuration. In this example we want to use GitLab for Continuous Delivery, so we want to deploy and provision AWS infrastructure from a pipeline running in GitLab.
In this setup GitLab acts as the Identity Provider, GitLab Runners as the client and AWS as the app.
The first step is to let AWS know that we have an external identity provider. This is done by creating a new Identity Provider in the IAM console. Make sure to select OpenID Connect as the Provider type. The Provider URL is the URL of your GitLab instance. For SaaS hosted GitLab the URL is https://gitlab.com. For self-hosted versions use https://gitlab.yourdomain.tld (must start with https:// and not include a trailing “/”). Click on Get thumbprint to fetch the thumbprint of the provider’s certificate. Finally specify the Audience or client ID. This is again the same value as used for the Provider URL. Click on Add provider to create the new provider.
Now that the provider has been created the role can be createdcan created. Go to the create role section in the IAM console and create a new role with Web identity as the trusted entity. Select the Identity provider and Audience created in the previous step. Click Next and create a policy. Copy/paste the policy from the JSON snippet below:
{
   "Version": "2012-10-17",
   "Statement": [       {
           "Sid": "GitLabPolicy",
           "Effect": "Allow",
           "Action": "sts:GetCallerIdentity",
           "Resource": "*"
       }
   ]
}
Click next until you see the “Review policy” page. Now enter a name, for example gitlab-policy and finish by clicking Create policy. Now go back to the tab/window where we started creating the role. Hit the refresh button and select the policy created in the previous step. Click Next. Now provide a name for the role and click Create role. The role will be created. Now search for the role on the role overview page. Open the role and copy the ARN. This should be in the syntax of arn:aws:iam::<account-id>:role/<name of the role>.
Now we’ve created a role, but basically any GitLab customer would be able to assume the role. We need to lock it down by adding a condition in the assume-role policy document. Go to the tab Trust relationships and replace the existing condition with:
{
   "Condition": {
       "StringEquals": {
         "gitlab.com:sub": "project_path:mygroup/myproject:ref_type:branch:ref:main"
       }
   }
}
The final trust policy should look like:
{
   "Version": "2012-10-17",
   "Statement": [
       {
           "Effect": "Allow",
           "Principal": {
               "Federated": "arn:aws:iam::<account-id>:oidc-provider/gitlab.com"
           },
           "Action": "sts:AssumeRoleWithWebIdentity",
           "Condition": {
               "StringEquals": {
                   "www.gitlab.com:sub": "project_path:mygroup/myproject:ref_type:branch:ref:main"
               }
           }
       }
  ]
}
More fields to be used in the condition can be found here.
After configuring AWS you can now configure your GitLab project to retrieve temporary credentials from AWS Security Token Service (STS). First add a new variable to your project. The name of this variable is ROLE_ARN and the value should be the exact ARN from the role created previously. The CI_JOB_JWT_V2 is predefined by GitLab and contains the current JWT token.
Now add the following step to your jobs in .gitlab.yml:
assume_role:
 script:
   - >
     STS=($(aws sts assume-role-with-web-identity
     --role-arn ${ROLE_ARN}
     --role-session-name "gitlab-${CI_PROJECT_ID}-${CI_PIPELINE_ID}"
     --web-identity-token ${CI_JOB_JWT_V2}
     --query 'Credentials.[AccessKeyId,SecretAccessKey,SessionToken]'
     --output text))
   - export AWS_ACCESS_KEY_ID="${STS[0]}"
   - export AWS_SECRET_ACCESS_KEY="${STS[1]}"
   - export AWS_SESSION_TOKEN="${STS[2]}"
   - aws sts get-caller-identity
Now trigger your pipeline by pushing a change to your version control repository. The get-caller-identity should return a result like:
{
"UserId": "AROA<user-id>",
"Account": "<account-id>",
"Arn": "arn:aws:sts::<account-id>:assumed-role/<role-name>/<gitlab-project-id>-<gitlab-pipeline-id>"
}
You’ve now successfully established an identity flow between GitLab and AWS using short-lived credentials. This way you nodon’t longer have to secure and rotate static AWS credentials.
In the steps above we’ve manually created the resources to get a good understanding of all the required steps. In production environments you want to provision the resources using Infrastructure as Code. Putting it all together in AWS CDK (v2):
import { App, Stack, StackProps, CfnOutput } from 'aws-cdk-lib';
import { Construct } from 'constructs';

import { aws_iam as iam } from 'aws-cdk-lib';

interface GitLabOidcProps extends StackProps {
 gitLabURI: string;
 gitLabProjectPath: string;
};

export class GitLabOidc extends Stack {
 constructor(scope: Construct, id: string, props: GitLabOidcProps) {
   super(scope, id, props);

   // Configure OIDC provider
   // See https://docs.gitlab.com/ee/ci/cloud_services/aws/#add-the-identity-provider
   const oidcProvider = new iam.OpenIdConnectProvider(this, 'Provider', {
     url: props.gitLabURI,
     clientIds: [ props.gitLabURI, ],
   });

   // Create the role
   const role = new iam.Role(this, 'Role', {
     assumedBy: new iam.OpenIdConnectPrincipal(oidcProvider).withConditions({
       'StringEquals': {
         [ props.gitLabURI.substring(8) + ':sub' ]: 'project_path:' + props.gitLabProjectPath,
       }
     }),
     description: 'GitLab pipeline role',
   });

   // Create the policy to attach to the role
   // Note: this is an example, needs
   const policy = new iam.ManagedPolicy(this, 'Policy', {
     statements: [
       new iam.PolicyStatement({
         sid: 'GitLabPolicy',
         actions: [ 'sts:GetCallerIdentity', ],
         resources: [ '*', ],
       }),
     ],
   });
   role.addManagedPolicy(policy);

   new CfnOutput(this, 'pipelineRoleArn', {
     value: role.roleArn,
     description: 'Role ARN to assume by pipeline',
   });
 }
}

// for development, use account/region from cdk cli
const devEnv = {
 account: process.env.CDK_DEFAULT_ACCOUNT,
 region: process.env.CDK_DEFAULT_REGION,
};

const app = new App();
new GitLabOidc(app, 'MyGitLabIntegration', {
 env: devEnv,
 gitLabURI: 'https://gitlab.com',
 gitLabProjectPath: 'mygroup/myproject:ref_type:branch:ref:main',
});
This specific post on OpenID Connect is about configuring GitLab for deployments to AWS, but something similar can be done for other DevOps-tools. For example using GitHub and Azure DevOps. But AWS has released a lot of new cool stuff as well. Check out my earlier blogs!

